WebGL is a low-level JavaScript API that’s based on OpenGL ES 2.0 graphical API. It was developed by Khronos, which also created many versions of OpenGL. The WebGL API allows you to create real-time 3D graphics directly in your browser and, since it’s a web standard, it doesn’t require an installation of any plugins.
How does it work?
Due to its low level, WebGL is not the simplest of tools. It helps if you’ve already had the opportunity to work with OpenGL since much of the WebGL technology has been fully borrowed from it.
WebGL stores geometric data in buffers that are sent to the GPU. These data are then used to transfer shapes and figures to the screen using shader vertices and shader fragments. Shader vertex transforms the coordinates of three-dimensional space points according to the rotation and position of the object and the two-dimensional projection on the plane. The fragment shader calculates the colour values used to fill the triangles that are forming the figures on the screen. Below is a diagram of the action created by Joe Groff:
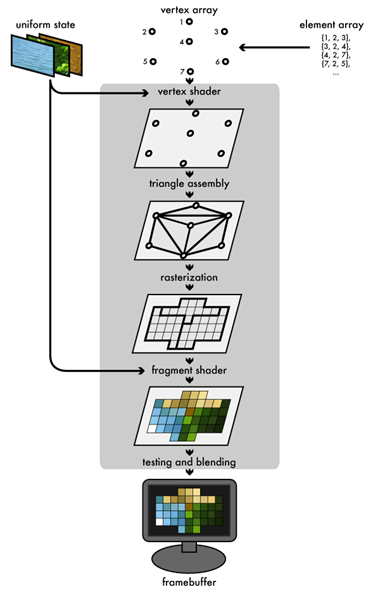
Source: An intro to modern OpenGL. Chapter 1: The Graphics Pipeline
Sounds a bit scary, right? Fortunately, with time, JavaScript libraries have been developed to support WebGL, making working with this API faster and more enjoyable. The most popular library is Three.js, which I can highly recommend. It’s not only extremely powerful but also contains implementations of such ready-made solutions as operations on matrix and vectors or predefined 3D primitives (objects).
How to start working with WebGL
The first thing we need is, of course, a Canvas element and reference to its WebGL context.
var canvas = document.getElementById("canvas");
var GL = initWebGL(canvas);

function initWebGL(canvas) {
  this.GL = null;

  try {
	// Try to grab the standard context. If it fails, fallback to experimental.
	this.GL = canvas.getContext("webgl") || canvas.getContext("experimental-webgl");
  }
  catch(e) {}

  // If we don't have a GL context, give up now
  if (!this.GL) {
	alert("Unable to initialize WebGL. Your browser may not support it.");
	this.GL = null;
  }

  return this.GL;
}
What we’re going to do today is a bit different than what I’ve done in my previous article. Due to incomplete support for WebGL, the first thing we have to do is check whether the webgl context is available. If not, we need to check whether experimental-webgl (an experimental version implemented in the browser) is available. Otherwise, we will display a message indicating no support.
At the moment WebGL supports all browsers except IE below version 11. However, when it comes to mobile devices WebGL support is more limited. It has been introduced since the version 5 of iOS. However, only Chrome, Firefox, and Opera browser are supported on phones with Android (and usually only on newer ones) - the native Android browser doesn’t support WebGL. Another thing that factors an API support is the smartphone hardware.
How to create a cube in WebGL and not go crazy
The example of code shown above was used as an introduction to WebGL. However, to avoid the low-level code, I’m going to use Three.js library, which was created with a sole purpose to make the WebGL usage easier.
The previous piece of code will no longer be needed, so we’ll just need to attach the Three.js library to the document.
Creating three-dimensional images with Three.js is similar to making movies - we are the producer, director, and scriptwriter. The first thing we need to do to create our masterpiece is the place where the action will happen, which in this case is called THREE.Scene.
Naturally, our film can’t be created unless we have cameras and tapes, which in JavaScript are respectively THREE.PerspectiveCamera and THREE.WebGLRenderer.
Creation of a scene is reduced only to calling the function mentioned above. It’s different, however, when it comes to the camera since its function takes critical parameters:
PerspectiveCamera( fov, aspect, near, far )
fov – (field of view) vertical view of the camera specified in degrees, the angle between the upper and lower edges of the camera's view;
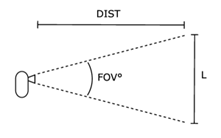
- aspect – an image format, i.e. the width to height ratio, where 1 stands for a square image;
- near and far - the planes that define the view frustum for the camera, only the objects that will be between these planes will be visible to the camera.
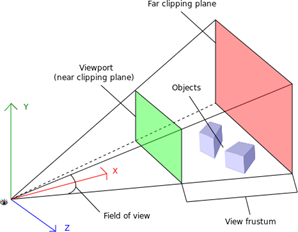
With this knowledge, we can move on to creating our first cube-driven scene.
See the Pen Three.js basic scene p1 by Burger (@Burger) on CodePen.
Let's analyse the above code. In the beginning, we need to declare variables that are available globally.
In init () function we’ll define image dimensions and camera parameters, then we have to initiate our scene by:
scene = new THREE.Scene();
Next we will create camera, "put in on a tripod", and set its position in the scene.
camera = new THREE.PerspectiveCamera(fov, aspect, near, far);

camera.position.x = 300;
camera.position.z = 300;
camera.position.y = 200;
Now we have to direct our camera to the "filmed" object - the object doesn’t exist yet, but we know we will put it in the middle of the scene. To do this, we need to tell the camera where to look. The function we will use to do that is called lookAt - we have to pass to it the vector of coordinates that the camera has to be directed to:
The camera was taken care of, so now we need to "burn our image to tape", which in this case is WebGLRenderer object. It's responsible for displaying what we will come up with. By initiating it, we're going add the edge smoothing parameter to make our cube look nice.
renderer = new THREE.WebGLRenderer({
    antialias: true,
});
Now we have to set the image size from the previously defined measurements.
renderer.setSize(width, height);
The last thing when it comes to preparing the scene is adding canvas element to our document.
container = document.getElementById('scene');
container.appendChild(renderer.domElement);
container = document.getElementById('scene');
container.appendChild(renderer.domElement);
The coveted cube
To prepare the scene we need to add our cube. We would have to define each vertex separately in pure WebGL, but ThreeJs makes it much easier. By using the THREE.BoxGeometry, at the beginning we define the dimensions of the box only in 3D.
let geometry = new THREE.BoxGeometry( 100, 100, 100 );
This is just a definition of object geometry. To make the object visible in the scene, we have to create a mesh and transfer the created geometry and material to it.
let material = new THREE.MeshBasicMaterial( { color: 0xd97d34 } );
let cube = new THREE.Mesh( geometry, material );
That's all it takes to create a cube. However, there's only one problem - it's still invisible. Why? It still needs to be attached to the scene.
scene.add( cube );
Let's shed some light on this!
Okay, we wanted a cube, but right now all we have is a blot in Merixstudio's colour. And that's not a bug - we used THREE.MeshBasicMaterial, thanks to which we could see anything. However, in the case of other types of materials, we need light in the scene. So let's try to give depth to our cube.
See the Pen Three.js basic scene p2 by Burger (@Burger) on CodePen.
The first thing we have to do is change the type of box material...
let material = new THREE.MeshPhongMaterial ({color: 0xd97d34});
... and suddenly everything got dark. We must, therefore, add some light:
function lighting() {
  const d = 200;
  const light = new THREE.DirectionalLight( 0xffffff, 1);
  light.position.set( -100, 500, 400 );               //default; light shining from top
  light.castShadow = true;            // default false
  light.shadowCameraFar = 1000;

  light.shadowCameraLeft = -d;
  light.shadowCameraRight = d;
  light.shadowCameraTop = d;
  light.shadowCameraBottom = -d;

  scene.add( light );
  scene.add( new THREE.HemisphereLight( 0xffffbb, 0x080820, 0.6 ) );
  scene.add( new THREE.AmbientLight(0x666666) );
}
We're using directional light, which in its parameters takes the colour and intensity of the given light.
const light = new THREE.DirectionalLight( 0xffffff, 1);
Then we give him a position in the scene...
light.position.set( -100, 500, 400 );
... and add the light to it:
scene.add( light );
Thanks to that our cube got some depth.
There is never only a single light source in real life, therefore we will need to add two more types of it.
scene.add( new THREE.HemisphereLight( 0xffffbb, 0x080820, 0.6 ) );
scene.add( new THREE.AmbientLight(0xa59f75, 0.6) );
Ambient Light is an ambient light (duh!), while Hemisphere Light is designed to simulate the light of the sky and the reflection of the ground (it's the imitation of Global Illumination).
Adding the shadow
To add the shadow, we have to add the element on which the cube will throw it.
function createFloor () {
   var planeGeometry = new THREE.PlaneBufferGeometry (400, 400, 10, 10);
   var planeMaterial = new THREE.MeshStandardMaterial ({color: 0x45545a})
   let plane = new THREE.Mesh (planeGeometry, planeMaterial);
   plane.position.set (0, -100, 0);

   plane.receiveShadow = true;
   plane.rotation.x = -90 * Math.PI / 180;
   scene.add (plane);
}
It's also important to mark that the object is going to receive shadows...
plane.receiveShadow = true;
...and that the cube will throw them.
cube.castShadow = true;
The next step is to enable shadow rendering in the renderer.
renderer.shadowMap.enabled = true;
And now we need to prepare the light so that it can shed a shadow.
light.castShadow = true;
But that's not all - we still have to set the size of the light stream. Currently, it looks like this:
We need to set its size...
const d = 200;
light.shadowCameraLeft = -d;
light.shadowCameraRight = d;
light.shadowCameraTop = d;
light.shadowCameraBottom = -d;
... as well as the stream range.
light.shadowCameraFar = 1000;
And that's our final effect.
That's it! My tutorial might've been lengthy, but I would like to think it was helpful. :) If you’re ready to finally learn WebGL using Three.js, check out their great documentation and a many awesome examples. It will allow you to make an Oscar-winning movie! ;)
.svg)



.svg)
.svg)
.avif)

.avif)
.avif)
.avif)
