In the first part of my article series, I introduced you the NativeScript CLI installation and running the mobile app in the initial stage. Here, in the second part, we will focus on:
- creating the category button;
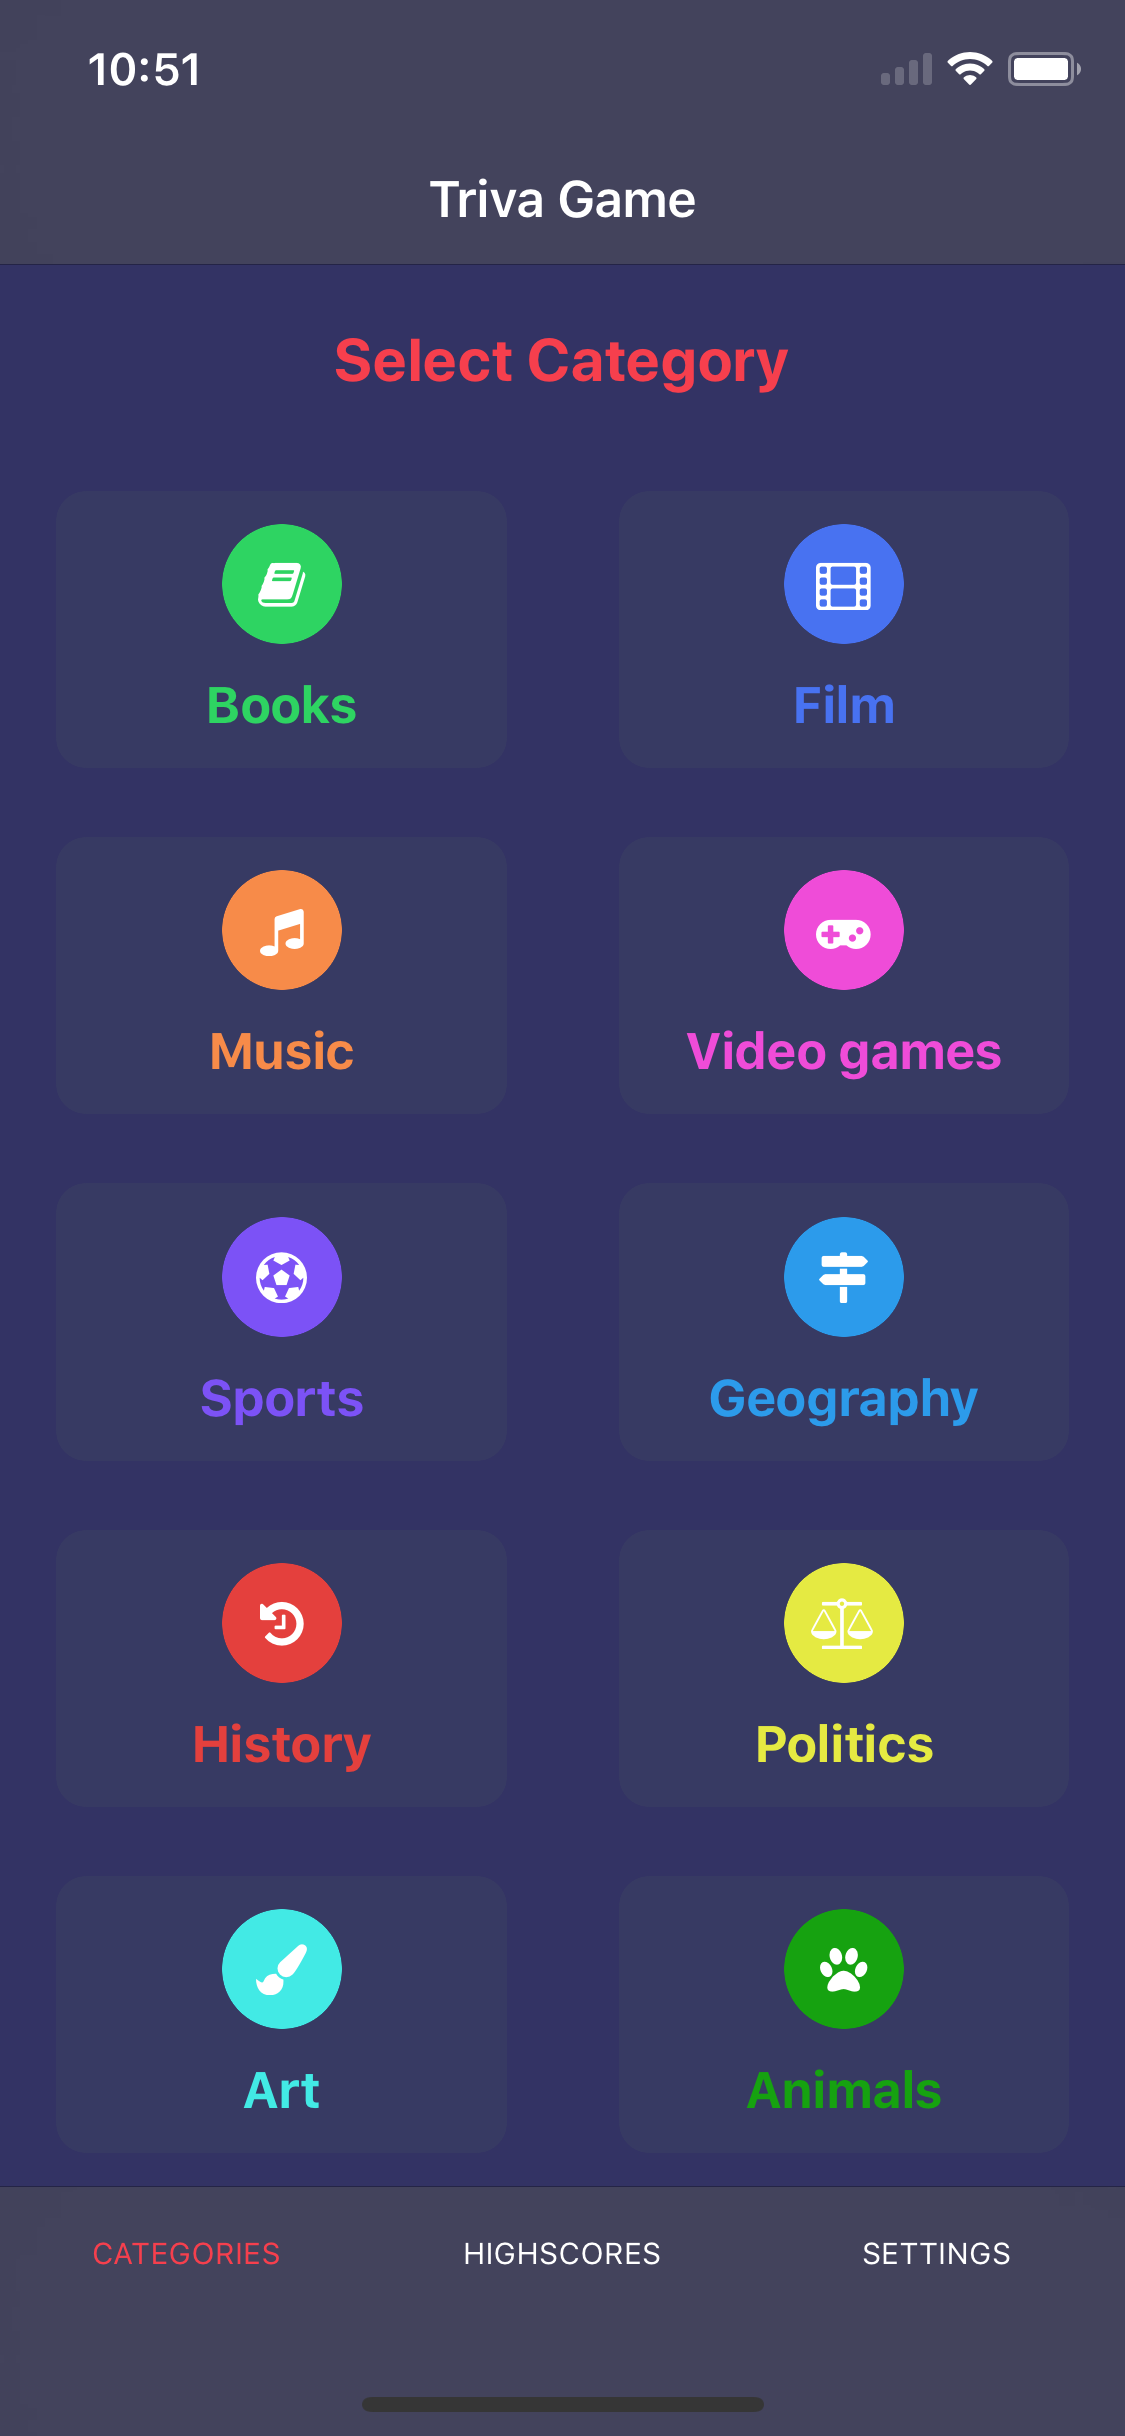
- displaying the category list on the home screen;
- creating the game module;
- animating the button.
In our app, we are going to use the public API to get a pool of questions from a given category.
Each category has its unique ID, which we will pass as query params in the GET request to API. Therefore, at the very beginning, we will create an enum file in which the ID will be stored for the categories we have selected. To create an enum file in the appropriate directory, use the Angular CLI, enter the following command to the terminal.
ng generate enum ./module/core/entity/category/category-type
/src/app/module/core/entity/category/category-type.enum.ts
export enum CategoryType {
  BOOKS = 10,
  FILM = 11,
  MUSIC = 12,
  VIDEO_GAMES = 15,
  SPORTS = 21,
  GEOGRAPHY = 22,
  HISTORY = 23,
  POLITICS = 24,
  ART = 25,
  ANIMALS = 27,
}
Hint: In Angular, a good practice is to store interfaces and enum files in the core module.
Creating the category button
Now we can fill the space on the home screen. For this, we are going to create a category button component and then use it to display all categories on a special type of template, which is GridLayout. To make this task easier, we will use Angular CLI to generate a new component:
ng generate component ./module/categories/components/category-button --module ./module/categories
Note: In this project, we are using NativeScript 5.x that supports two different ways for building applications - the bundle workflow and the legacy workflow. Unfortunately, this forces us to manually add the "moduleId" property to each newly generated component.
@Component({
  selector: 'tg-category-button',
  templateUrl: './category-button.component.html',
  styleUrls: ['./category-button.component.css'],
  moduleId: module.id, // <-- HERE
})@NgModule({
  schemas: [NO_ERRORS_SCHEMA],
  imports: [
    NativeScriptCommonModule,
    NativeScriptRouterModule,
    CategoriesRoutingModule,
  ],
  declarations: [
    CategoriesListComponent,
    CategoryButtonComponent, // <-- HERE
  ],
})
export class CategoriesModule { }
The tg-category-button component will take several properties:
- text - category name;
- icon - icon unicode from FontAwesome package
- color - button color;
- row - row in which you want to display the button in GridLayout
- col - column in which you want to display the button in GridLayout
- categoryId - unique category ID.
NativeScript templates
Nativescript, unlike React-Native, has several types of templates on which we can display application content. We can distinguish such templates as:
- AbsoluteLayout;
- DockLayout;
- GridLayout;
- StackLayout;
- WrapLayout,
- FlexboxLayout.
I won’t describe each of them in detail here, because that's what documentation is for. I assume that you can probably guess what most of them work just by reading its name. In this part of the article, I will focus only on GridLayout, because we are going to use it to display category buttons.
GridLayout allows you to define your own grid, on which we can arrange components in a very convenient way. In addition, it allows you to solve the problem related to the app resolution on different devices. Thanks to this, our grid will be flexible and the elements displayed will adapt to it. Read here how to use it. The code of our component looks like this:
src/app/module/categories/components/category-button/category-button.component.ts
import { Component, Input, OnInit } from '@angular/core';
import { GestureEventData } from 'tns-core-modules/ui/gestures';

@Component({
  selector: 'tg-category-button',
  templateUrl: './category-button.component.html',
  styleUrls: ['./category-button.component.css'],
  moduleId: module.id, // AD.1
})
export class CategoryButtonComponent implements OnInit {
  // AD.2
  @Input() text: string;
  @Input() icon: string;
  @Input() color: string;
  @Input() row: string;
  @Input() col: string;
  @Input() categoryId: string;

  constructor() { }

  ngOnInit() {
  }

  // AD.3
  handleTap(args: GestureEventData) {
    console.log('Navigate to game, category id: ', this.categoryId);
  }
}
src/app/module/categories/components/category-button/category-button.component.html
<StackLayout [row]="row" [col]="col"> <!-- AD.4 -->
  <StackLayout
    class="button-container"
    (tap)="handleTap($event)" <!-- AD.5 -->
  >
    <StackLayout
      class="icon-circle"
      [backgroundColor]="color"
    >
      <!-- AD.6 -->
      <Label
        [text]="icon"
        class="far icon"
      ></Label>
    </StackLayout>
    <Label
      class="title"
      [text]="text"
      [color]="color"
    ></Label>
  </StackLayout>
</StackLayout>
- AD 1 - once again I point out the fact that every component in NativeScript must have the moduleId parameter in the component decorator;
- AD. 2 - declaration of parameters that the component takes;
- AD. 3 - an additional method that will capture the tap event and then redirect to the game;
- AD.4 - StackLayout is the simplest type of template that displays each element under itself by default. In addition, we pass in the parameters row and col, which will determine the position on the grid of the GridLayout;
- AD.5 - link the tap event to the StackLayout element and its children.
- AD.6 - Label is one of the widgets provided by NativeScript. This is the basic component for displaying text in the application because NativeScript does not allow displaying the text itself.
Once we've created the category-button component, we can display the categories of our game on the grid:
src/app/module/categories/containers/categories-list/categories-list.component.ts
import { Component, OnInit } from '@angular/core';
import { CategoryType } from '~/app/module/core/entity/category/category-type';

@Component({
  selector: 'tg-categories-list',
  templateUrl: './categories-list.component.html',
  styleUrls: ['./categories-list.component.css'],
  moduleId: module.id,
})
export class CategoriesListComponent implements OnInit {
  private categoryType = CategoryType; // AD.1

  constructor() { }

  ngOnInit() { }

}
src/app/module/categories/containers/categories-list/categories-list.component.html
<StackLayout class="main">
<ActionBar title="Triva Game" class="action-bar"></ActionBar> <!-- AD.2 -->
<Label class="title" text="Select Category"></Label>
<!-- AD.3 -->
<GridLayout
columns="*, *"
rows="*, *, *, *, *"
>
<!-- AD.4 -->
<tg-category-button
icon=""
color="#2ed462"
row="0"
col="0"
text="Books"
[categoryId]="categoryType.BOOKS"
></tg-category-button>
<tg-category-button
icon=""
color="#4872f1"
row="0"
col="1"
text="Film"
[categoryId]="categoryType.FILM"
></tg-category-button>
<tg-category-button
icon=""
color="#f78b49"
row="1"
col="0"
text="Music"
[categoryId]="categoryType.MUSIC"
></tg-category-button>
<tg-category-button
icon=""
color="#ef4cd8"
row="1"
col="1"
text="Video games"
[categoryId]="categoryType.VIDEO_GAMES"
></tg-category-button>
<tg-category-button
icon=""
color="#7c52f6"
row="2"
col="0"
text="Sports"
[categoryId]="categoryType.SPORTS"
></tg-category-button>
<tg-category-button
icon=""
color="#2c9beb"
row="2"
col="1"
text="Geography"
[categoryId]="categoryType.GEOGRAPHY"
></tg-category-button>
<tg-category-button
icon=""
color="#e4403d"
row="3"
col="0"
text="History"
[categoryId]="categoryType.HISTORY"
></tg-category-button>
<tg-category-button
icon=""
color="#e5ea42"
row="3"
col="1"
text="Politics"
[categoryId]="categoryType.POLITICS"
></tg-category-button>
<tg-category-button
icon=""
color="#42eae5"
row="4"
col="0"
text="Art"
[categoryId]="categoryType.ART"
></tg-category-button>
<tg-category-button
icon=""
color="#16a210"
row="4"
col="1"
text="Animals"
[categoryId]="categoryType.ANIMALS"
></tg-category-button>
</GridLayout>
</StackLayout>
- AD.1 - save to the private property of the enum class with categories;
- AD.2 - ActionBar is another widget (component) provided by NativeScript. It allows you to add the top header, in which you can display the title for a given section and return buttons to the previous screen;
- AD.3 - here we define our grid, which will consist of 2 columns with the maximum available width and 5 rows with the maximum available height;
- AD.4 - we use the previously created tg-category-button component, to which we pass the icon in the form of a unicode and positions, using the column number and row. Another important parameter is categoryId, in which we pass the category id from our enum file.
At this point, we’ve already finished the main logic of the category view. The project still lacks the visual side, but we will deal with that later. In the next step, we will focus on is to create an initial view of the game - we will create a new module and container for this purpose.
ng generate module ./module/gameng generate component ./module/game/containers/start-screen --module ./module/game
Note: In this project, we are using NativeScript 5.x that supports two different ways for building applications - the bundle workflow and the legacy workflow. Unfortunately, this forces us to manually add the "moduleId" property to each newly generated component.
To make our new module complete, we need to create a separate routing for it.
src/app/module/game/game-routing.module.ts
import { NgModule } from '@angular/core';
import { Routes } from '@angular/router';
import { NativeScriptRouterModule } from 'nativescript-angular/router';
import { StartScreenComponent } from '~/app/module/game/containers/start-screen/start-screen.component';

export const routes: Routes = [
  {
    path: '',
    component: StartScreenComponent,
  },
];

@NgModule({
  imports: [NativeScriptRouterModule.forChild(routes)],
  exports: [NativeScriptRouterModule]
})
export class GameRoutingModule { }
and attach this module to the main routing:
src/app/app-routing.module.ts
import { NgModule } from '@angular/core';
import { NativeScriptRouterModule } from 'nativescript-angular/router';
import { Routes } from '@angular/router';

const routes: Routes = [
  {
    path: '',
    redirectTo: '/tabs/default',
    pathMatch: 'full'
  },
  {
    path: 'tabs',
    loadChildren: () => import('~/app/module/tabs/tabs.module').then(m => m.TabsModule),
  },
  { // HERE
    path: 'game',
    loadChildren: () => import('~/app/module/game/game.module').then(m => m.GameModule),
  },
];

@NgModule({
  imports: [NativeScriptRouterModule.forRoot(routes)],
  exports: [NativeScriptRouterModule]
})
export class AppRoutingModule { }
Creating an animation
The last thing we do in this part is to redirect to the given category after tapping on the screen. We need to go back to category-button-component.ts and complete the handleTap method. In addition, we will create a simple animation, which after tapping on the button, will expand and after a while return to its original size.
Creating animations in NativeScript is very simple and fun, just call the animate method on the element reference you want to animate. Each animation is an asynchronous operation, so you can create a promise on them that will allow you to execute some piece of code after the animation is finished or to call another animation, which we will do in our case.
/src/app/module/categories/components/category-button/category-button.component.ts
import { Component, Input, OnInit } from '@angular/core';
import { GestureEventData } from 'tns-core-modules/ui/gestures';
import { RouterExtensions } from 'nativescript-angular';
import { NavigationExtras } from '@angular/router';

@Component({
  selector: 'tg-category-button',
  templateUrl: './category-button.component.html',
  styleUrls: ['./category-button.component.css'],
  moduleId: module.id,
})
export class CategoryButtonComponent implements OnInit {
  @Input() text: string;
  @Input() icon: string;
  @Input() color: string;
  @Input() row: string;
  @Input() col: string;
  @Input() categoryId: string;

  constructor(
    private routerExtensions: RouterExtensions // AD.1
  ) { }

  ngOnInit() {
  }

  handleTap(args: GestureEventData) {
    const view = args.view; // AD.2
    view.animate({
      // AD.3
      scale: { x: 1.3, y: 1.3 },
      duration: 100,
    })
      .then(() => view.animate({
        // AD.4
        scale: { x: 1, y: 1 },
        duration: 100,
      }))
      .then(() => {
        // AD.5
        const navigationExtras: NavigationExtras = {
          queryParams: {
            categoryId: this.categoryId,
          }
        };
        this.routerExtensions.navigate( ['game'], navigationExtras);
      })
  }
}
- AD.1 - inject RouterExtensions, which is a NativeScript implementation of the Router service from the web version of Angular. Thanks to this we can navigate the mobile application in exactly the same way as in the web version;
- AD.2 - the args.view parameter returns references to the element being tapped;
- AD.3 - the first animation - scaling the button on both planes;
- AD.4 - the second animation - rescaling the button to its original size;
- AD.5 - after the second animation is finished, we redirect to the game path along with the categoryId parameter.
What are the next steps?
Well, that’s all for today. However, before you move on to the next part, you need to fill in the missing CSS files so that the application looks like on the pictures in the first article. You can do it in two different ways:
- You can complete the missing CSS files by copying their contents from our repository, or
- or switch to another branch in the repository and then download the changes.
git checkout step2git pull origin step2
Remember to analyze the files that have changed.

In the next part we will focus on:
- the view allowing you to choose the difficulty level of the game;
- downloading a set of questions to the selected category;
- displaying the downloaded questions;
- saving the answers given.
Here's PART 3 of building NativeScript app guide.
Want to create apps in cross-platform frameworks with our devs? Check our job offers and join Merixstudio team!
.svg)


.svg)
.svg)
.avif)

.avif)
.avif)
.avif)
