If you feel you need to look at the previous parts again, feel free to do it before taking up this part:
This article forms the third part of my series. Here we are going to focus on:
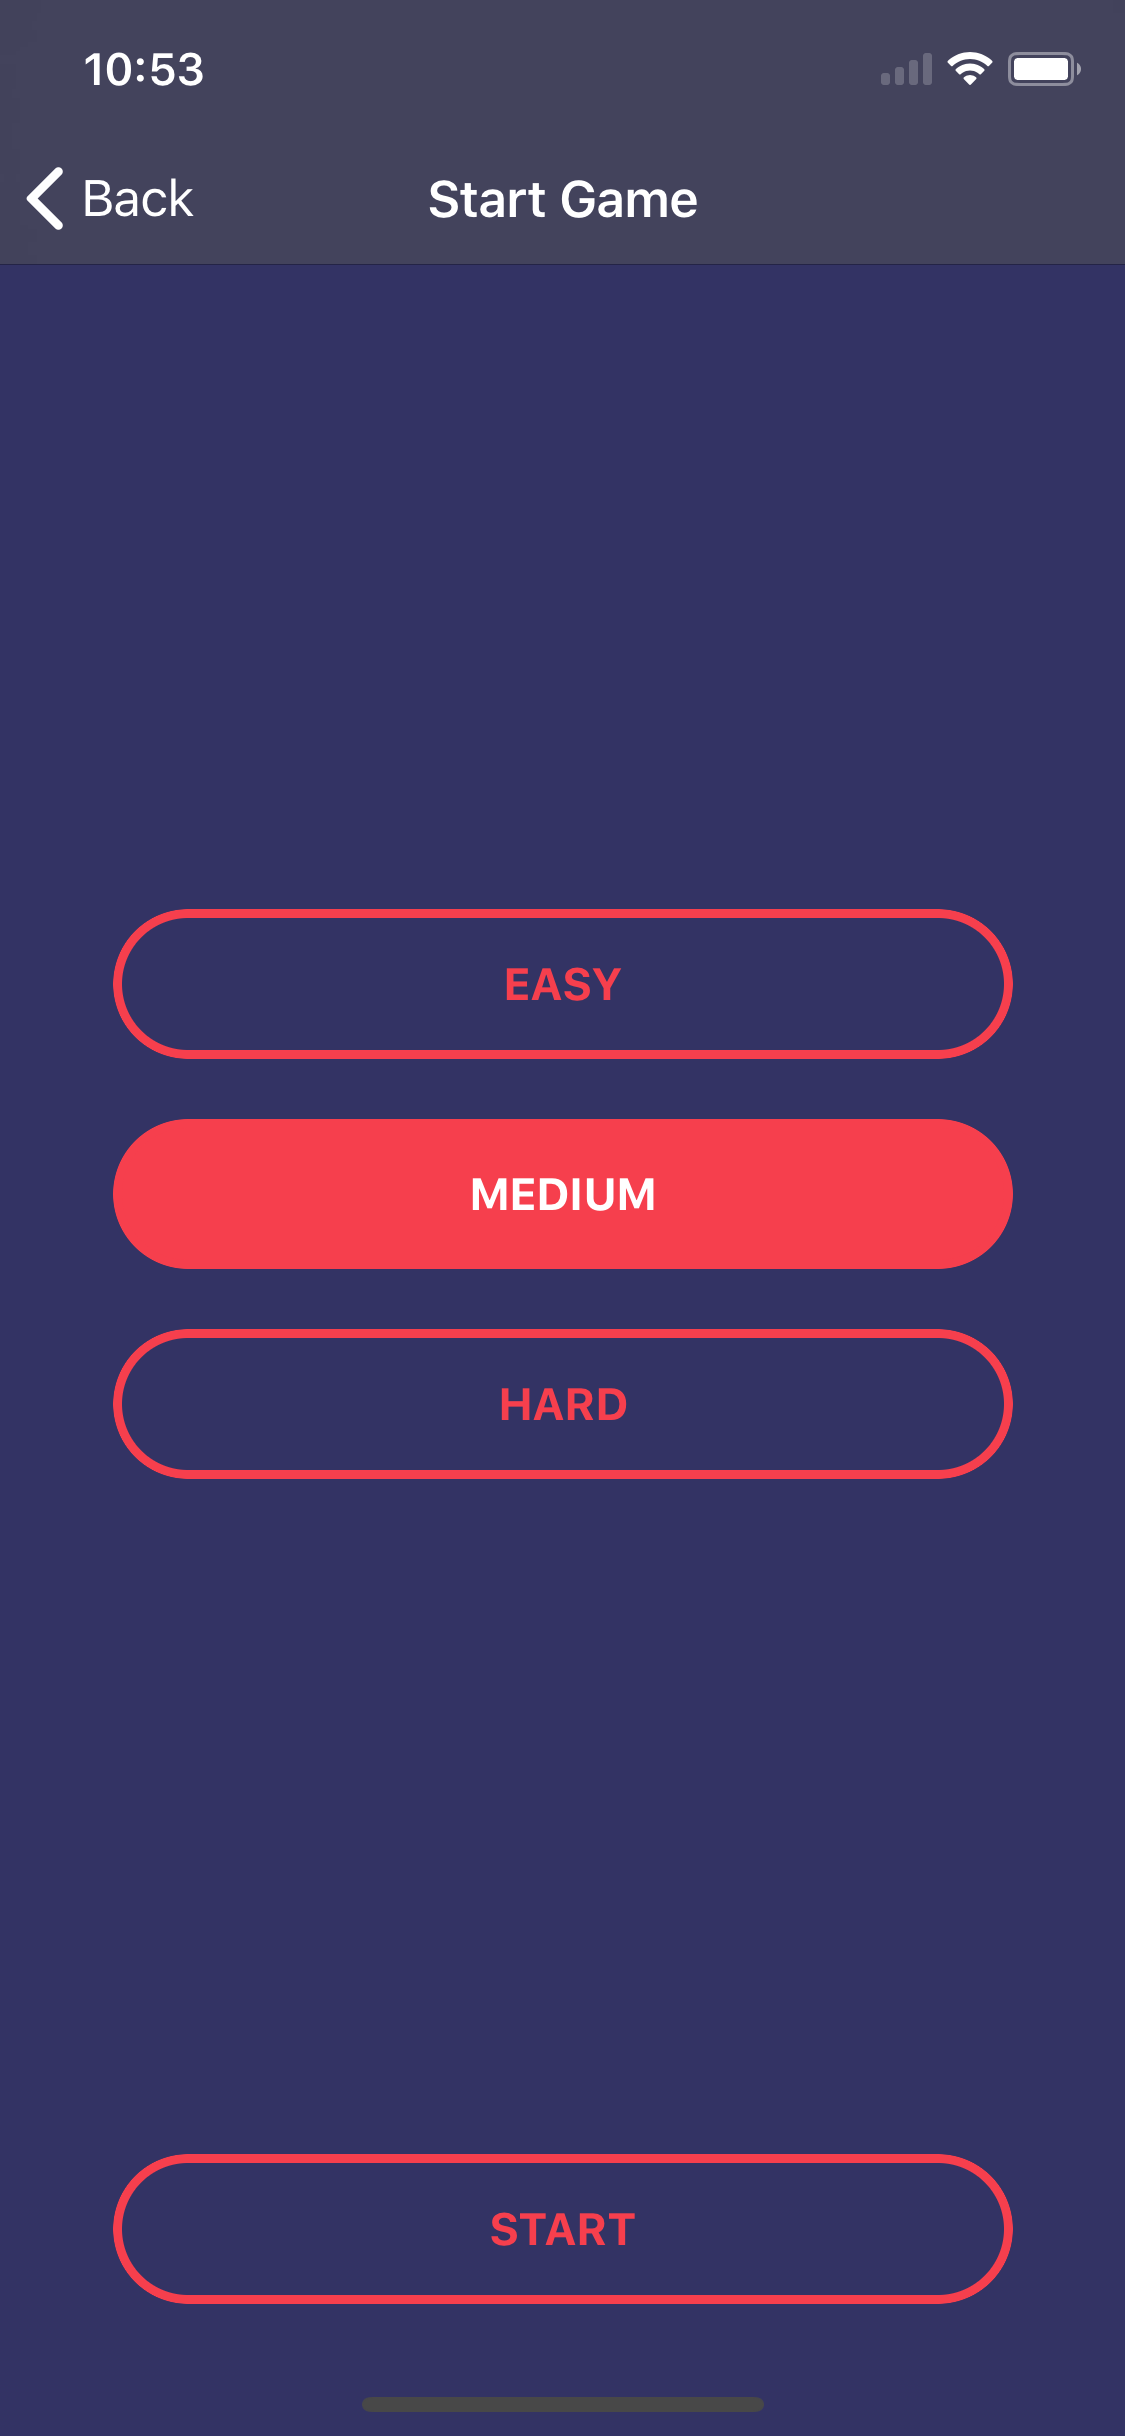
- view allowing you to choose the difficulty level of the game;
- getting a set of questions to the selected category;
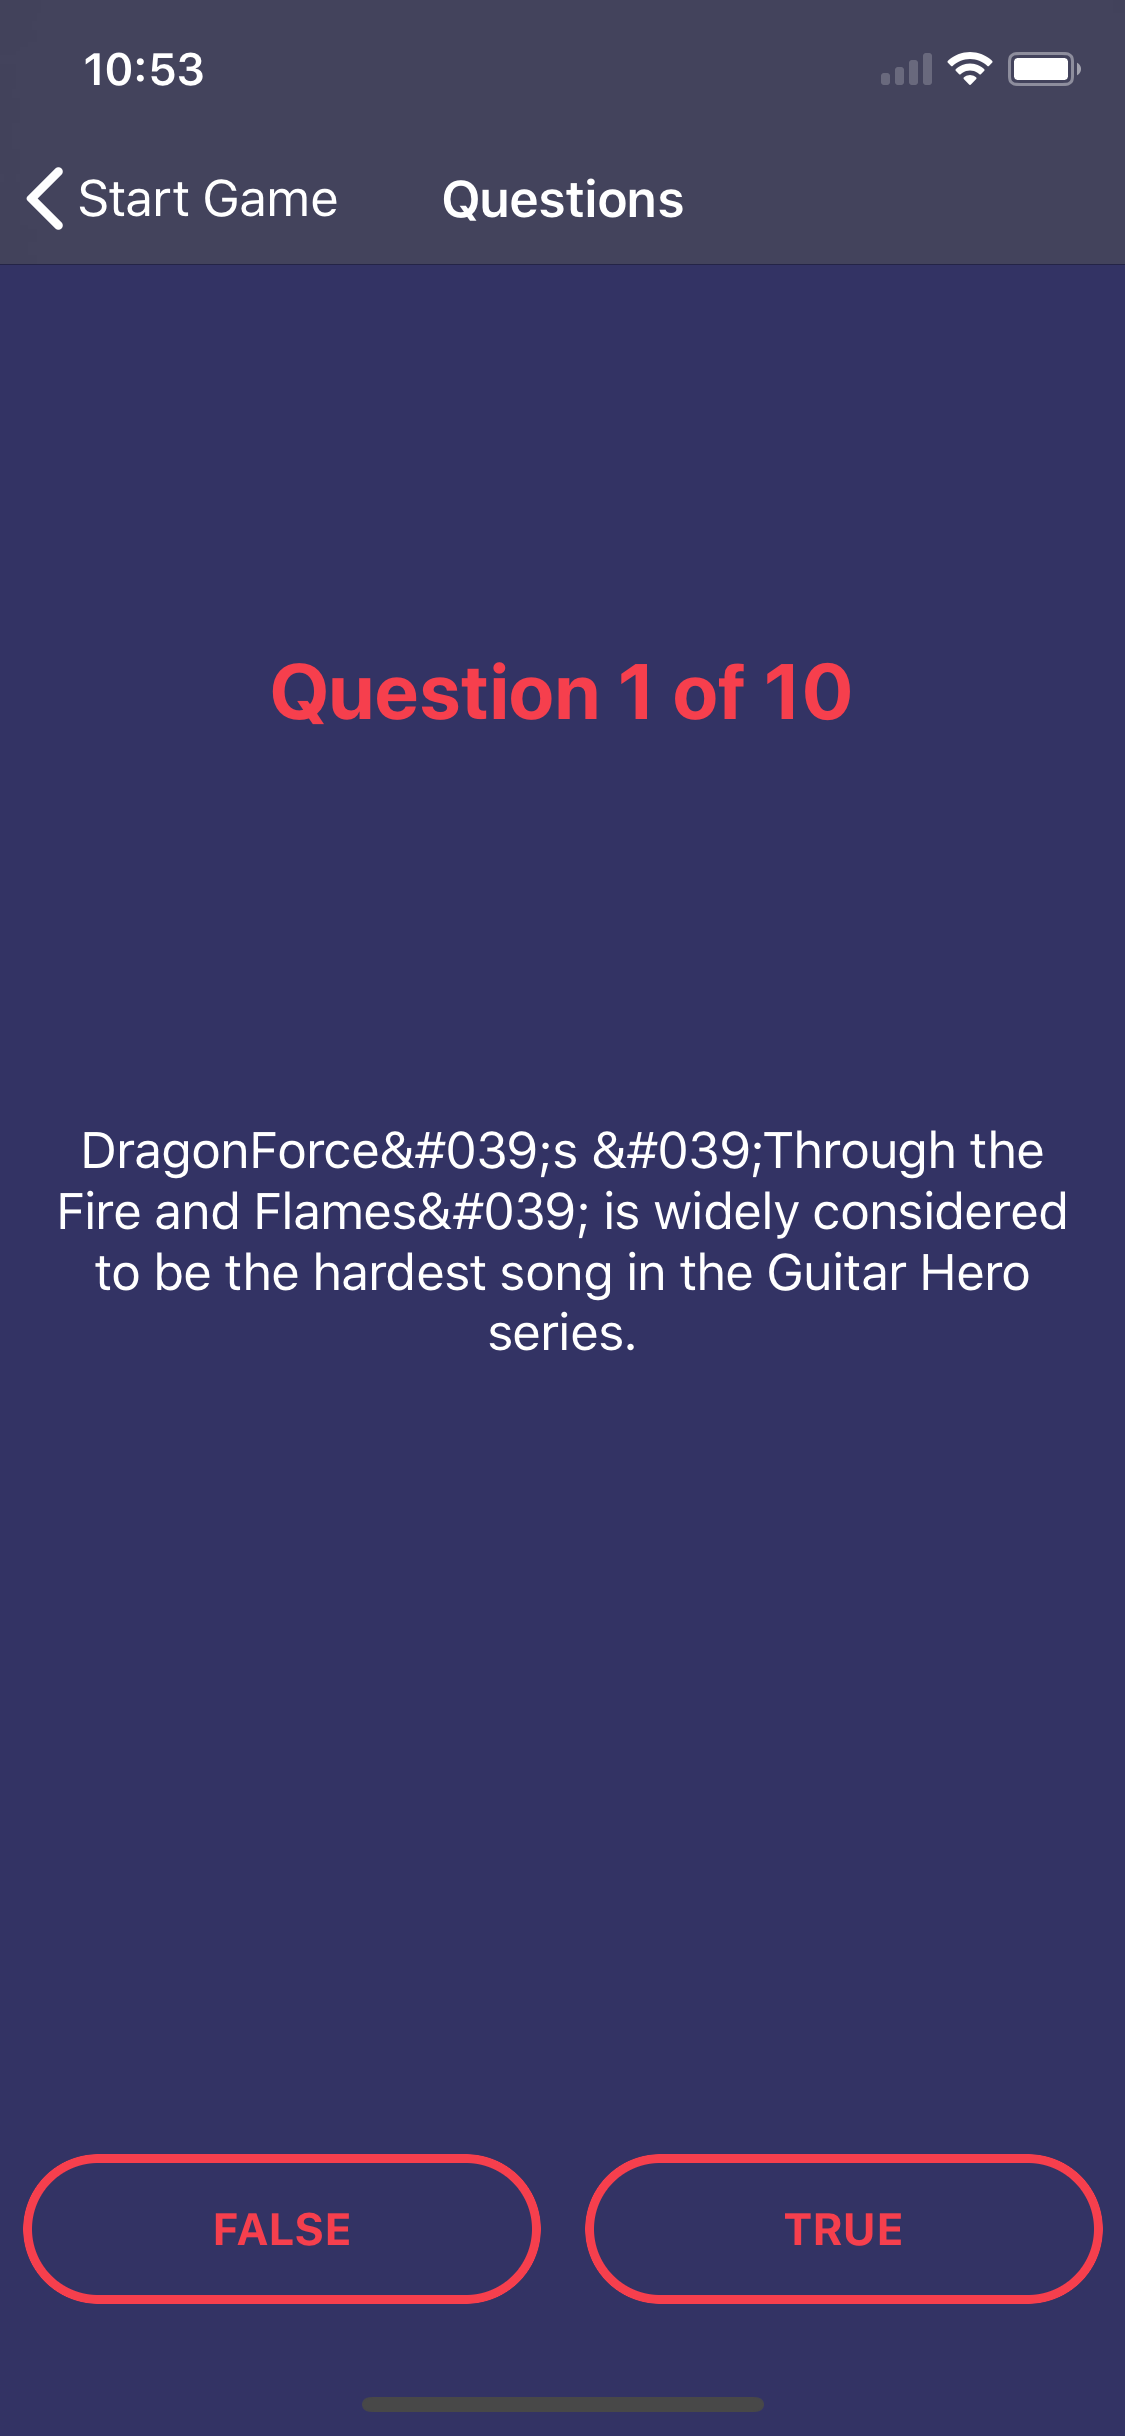
- displaying of downloaded questions;
- saving the answers.
Choosing difficulty levels
So, we start immediately from generating a new enum file and filling it with the difficulty levels from the API.
ng generate enum ./module/core/entity/difficulty/difficulty-type
src/app/module/core/entity/difficulty/difficulty-type.enum.ts
export enum DifficultyType {
  EASY = 'easy',
  MEDIUM = 'medium',
  HARD = 'hard',
}
Then we return to the start-screen container created in the previous article
src/app/module/game/containers/start-screen/start-screen.component.ts
import { Component, OnInit } from '@angular/core';
import { ActivatedRoute, NavigationExtras } from '@angular/router';
import { DifficultyType } from '~/app/module/core/entity/difficulty/difficulty-type.enum';
import { RouterExtensions } from 'nativescript-angular';

@Component({
  selector: 'tg-start-screen',
  templateUrl: './start-screen.component.html',
  styleUrls: ['./start-screen.component.css'],
  moduleId: module.id,
})
export class StartScreenComponent implements OnInit {
  private difficultyType = DifficultyType; // AD.1
  private categoryId: string;
  private difficulty: string;

  constructor(
    private route: ActivatedRoute,
    private routerExtensions: RouterExtensions
  ) { }

  ngOnInit() {
    this.difficulty = this.difficultyType.MEDIUM; // AD.2

    // AD.3
    this.route.queryParams.subscribe((params) => {
      this.categoryId = params['categoryId'];
    })
  }

  // AD.4
  changeDifficulty(difficulty) {
    this.difficulty = difficulty;
  }

  // AD.5
  startGame() {
    const navigationExtras: NavigationExtras = {
      queryParams: {
        categoryId: this.categoryId,
        difficulty: this.difficulty,
      }
    };
    this.routerExtensions.navigate( ['game', 'questions'], navigationExtras);
  }
}
src/app/module/game/containers/start-screen/start-screen.component.html
<!-- AD.6 -->
<GridLayout
  class="main"
  columns="*"
  rows="*, auto, auto, auto, *, auto"
>
  <ActionBar title="Start Game" class="action-bar"></ActionBar>

  <!-- AD.7 -->
  <Button
    row="1"
    text="Easy"
    [ngClass]="{ 'selected': difficulty === difficultyType.EASY }"
    (tap)="changeDifficulty(difficultyType.EASY)"
  ></Button>
  <Button
    row="2"
    text="Medium"
    [ngClass]="{ 'selected': difficulty === difficultyType.MEDIUM }"
    (tap)="changeDifficulty(difficultyType.MEDIUM)"
  ></Button>
  <Button
    row="3"
    text="Hard"
    [ngClass]="{ 'selected': difficulty === difficultyType.HARD }"
    (tap)="changeDifficulty(difficultyType.HARD)"
  ></Button>

  <Button
    row="5"
    text="Start"
    (tap)="startGame()"
  ></Button>
</GridLayout>
- AD.1 - saves to the private property of the enum with levels of difficulty;
- AD.2 - sets the default difficulty level to medium;
- AD.3 - gets forwarded parameters that are included with the redirection. In our case, this is the categoryId;
- AD.4 - a method to change the difficulty level;
- AD.5 - a method that redirects the user to the next view (at this moment this view does not exist yet, we will create it in a minute);
- AD.6 - we use GridLayout again, set 1 column and 6 rows, the first row pushes the content up from the top and the second row from the bottom up. Thanks to this rows from 2 to 4 are centered, and the last row is going to be placed at the very bottom of the screen;
- AD.7 - we use the default Button widget, whose background changes depending on the level of difficulty selected. We also attach a method to change the level of difficulty on the tap event.
Note: Nativescript provides several gestures that we can capture. These include, among others:
- TapDouble;
- TapLong;
- Press;
- Swipe;
- Pan;
- Pinch;
- Rotation;
- Touch.
As you can see there is quite a lot of it, you can read about each of these gestures in the official documentation. In the Nativescript there is no click event known from web applications, which is why the tap event is used instead of it.
Now, we can generate a container of the game itself and service responsible for its logic.
ng generate component ./module/game/containers/questions --module ./module/game
ng generate service ./module/core/service/game/game --spec false
Let's start with the newly created service and write to it several methods that allow us running the game and, among other things, getting questions from the selected categories and the difficulty level, saving user responses and counting points.
/src/app/module/core/service/questions/game.service.ts
import { Injectable } from '@angular/core';
import { HttpClient, HttpHeaders } from '@angular/common/http';
import { Observable } from 'rxjs';

@Injectable({
  providedIn: 'root'
})
export class GameService {
  private baseUrl: string = 'https://opentdb.com/api.php?type=boolean'; // AD.1
  private answers: any[] = []; // AD.2

  constructor(
    private http: HttpClient,
  ) { }

  private createRequestHeader() {
    let headers = new HttpHeaders({
      'Content-Type': 'application/json',
    });

    return headers;
  }

  // AD.3
  getQuestions(categoryId: string, difficulty: string, questionsAmount: number): Observable<any> {
    const serverUrl = `${this.baseUrl}&category=${categoryId}&difficulty=${difficulty}&amount=${questionsAmount}`;
    const headers = this.createRequestHeader();

    return this.http.get<any>(serverUrl, { headers: headers });
  }

  // AD.4
  setAnswer(question: string, answer: boolean | string, correctAnswer: boolean): void {
    this.answers.push({
      question,
      answer,
      correctAnswer,
    });
  }

  getAnswers() {
    return this.answers;
  }

  // AD.5
  getPoints() {
    const maxPoints = this.answers.length;

    const points = this.answers.reduce((sum, el) => {
      sum += el.answer === el.correctAnswer ? 1 : 0;

      return sum;
    }, 0);

    return {
      points,
      maxPoints,
    }
  }

  // AD.6
  reset() {
    this.answers = [];
  }
}
- AD.1 - we set the basic API address, which we will modify by adding query params with difficulty level and category id;
- AD.2 - the array in which we will store the answers given by the user;
- AD.3 - a method that sends an API request using an Angular http service and retrieves a pool of questions for a given game;
- AD.4 - at the moment when the user answers the question, we will use this method to save the answer and the question;
- AD.5 - a method for counting the number of points obtained in a given game. Iterate the answer array and depending on whether the user gave the correct answer, we add a point to the sum;
- AD.6 - a method for resetting the answer array, which we will need in case the user wants to start a new game.
Displaying the questions
Now we will take care of displaying all questions with answer buttons.
src/app/module/game/containers/questions/questions.component.ts
import { Component, OnInit } from '@angular/core';
import { ActivatedRoute } from '@angular/router';
import { EventData } from 'tns-core-modules/data/observable';
import { RouterExtensions } from 'nativescript-angular';
import { GameService } from '~/app/module/core/service/game/game.service';

@Component({
  selector: 'tg-questions',
  templateUrl: './questions.component.html',
  styleUrls: ['./questions.component.css'],
  moduleId: module.id,
})
export class QuestionsComponent implements OnInit {
  private categoryId: string;
  private difficulty: string;
  private questions: any[];
  private currentQuestion: any;
  private currentQuestionIndex: number;
  private questionsAmount: number;
  private isLoading: boolean;

  constructor(
    private route: ActivatedRoute,
    private routerExtensions: RouterExtensions,
    private gameService: GameService, // AD.1
  ) { }

  ngOnInit() {
    this.isLoading = true;

    this.route.queryParams.subscribe((params) => {
      this.questionsAmount = 10;
      this.categoryId = params['categoryId'];
      this.difficulty = params['difficulty'];

      this.gameService.reset(); // AD.2

      // AD.3
      this.gameService.getQuestions(this.categoryId, this.difficulty, this.questionsAmount)
        .subscribe(({ results }) => {
          this.questions = results;
          this.currentQuestionIndex = 0;
          this.currentQuestion = results[this.currentQuestionIndex];
          this.questionsAmount = results.length;
          this.isLoading = false;
        });
    });
  }

  // AD.4
  setAnswer(event: EventData | null, answer: boolean | '') {
    this.gameService.setAnswer(
      this.currentQuestion.question,
      answer,
      JSON.parse(this.currentQuestion.correct_answer.toLowerCase()),
    );

    this.nextQuestion();
  }

  // AD.5
  nextQuestion() {
    this.currentQuestionIndex += 1;
    this.currentQuestion = this.questions[this.currentQuestionIndex];

    if (!this.currentQuestion) {
      return this.routerExtensions.navigate(['game', 'result']);
    }
  }

  // AD.6
  getQuestion() {
    let question: string = '';

    if (this.currentQuestion) {
      question = this.currentQuestion.question;
    }

    return question;
  }
}
src/app/module/game/containers/questions/questions.component.html
<!-- AD.7 -->
<ng-container *ngIf="isLoading; else game">
  <GridLayout
    class="main"
    columns="*"
    rows="*"
  >
    <ActionBar title="Questions - Loading" class="action-bar"></ActionBar>

    <!-- AD.8 -->
    <ActivityIndicator
      row="2"
      colspan="2"
      busy="true"
      width="40"
      height="40"
      class="activity-indicator"
    ></ActivityIndicator>
  </GridLayout>
</ng-container>

<ng-template #game>
  <StackLayout class="main">
    <ActionBar title="Questions" class="action-bar"></ActionBar>

    <!-- AD.9 -->
    <ng-container *ngIf="questions.length; else noQuestions">
      <!-- AD.10 -->
      <GridLayout
        class="main"
        columns="*, *"
        rows="*, auto, *, auto, *, auto, *, auto"
      >
        <Label
          row="1"
          [text]="'Question ' + (currentQuestionIndex + 1) + ' of ' + questionsAmount"
          class="question-number"
          colspan="2"
        ></Label>
        <!-- AD.11 -->
        <Label
          row="3"
          class="question-text"
          textWrap="true"
          colspan="2"
          [text]="getQuestion()"
        ></Label>

        <!-- AD.12 -->
        <Button
          text="False"
          row="7"
          col="0"
          class="answer-button"
          (tap)="setAnswer($event, false)"
        ></Button>
        <Button
          text="True"
          row="7"
          col="1"
          class="answer-button"
          (tap)="setAnswer($event, true)"
        ></Button>
      </GridLayout>
    </ng-container>

    <ng-template #noQuestions>
      <GridLayout columns="*" rows="*, auto, *">
        <StackLayout
          row="1"
          class="no-questions"
        >
          <Label
            class="no-questions-title"
            text="Error"
          ></Label>
          <Label
            class="no-questions-description"
            text="No questions in this category in our database"
            textWrap="true"
          ></Label>
        </StackLayout>
      </GridLayout>
    </ng-template>
  </StackLayout>
</ng-template>
- AD.1 - we are injecting GameService, thanks to which we have access to all necessary methods needed for the course of the game;
- AD.2 - when the question view is loaded, we restart the answer array, because there may be data from the previous game;
- AD.3 - we get 10 API questions for the selected category and difficulty level. In addition, we save the first question and its index;
- AD.4 - a method that passes answers to GameService and then runs the nextQuestion method
- AD.5 - we increase the index of the current question, thanks to which we display the next one. When the pool of questions is over, the application redirects the user to the result of the game (the result view does not exist yet);
- AD.6 - we get the content of the current question;
- AD.7 - we have divided the view of the game into several smaller ones, which display different content depending on the conditions. Simply put: if our request is still being executed and we are waiting for the questions to be downloaded, we display the loader so that the user knows that the application doesn’t stop working but just loads something;
- AD.8 - ActivityIndicator is another widget provided by NativeScript. Its goal is to inform about the performed task in the application by displaying the loader;
- AD.9 - condition checking if the request has returned the question pool, if not - we display the information that there are no questions in this category. Otherwise, we display the first question and start the game;
- AD.10 - we use the grid again, this time to display questions and the game interface;
- AD.11 - we display the question using the Label widget. It is worth mentioning that by default the text is limited to one line. Therefore, if we have longer content, we must set the textWrap attribute to true;
- AD.12 - answer buttons that start the setAnswer method when tapping on them.
In order to be able to test our newly written functionalities, we need to do one more thing - connect the Questions container to the corresponding routing. To do this, you will need to return to the game-routing.module.ts file.
src/app/module/game/game-routing.module.ts
(...)
export const routes: Routes = [
  (...)
  {
    path: 'questions',
    component: QuestionsComponent,
  },
];
(...)
Once you've done it, you can start the game and see what it looks like now. As you can see, we already have a small outline of the game logic, but the application still lacks the visual side. so at this point, complete the missing CSS files. To this end, I encourage you to switch to the next branch or fill CSS files directly from the repository.
git checkout step3
git pull origin step3
The summary view


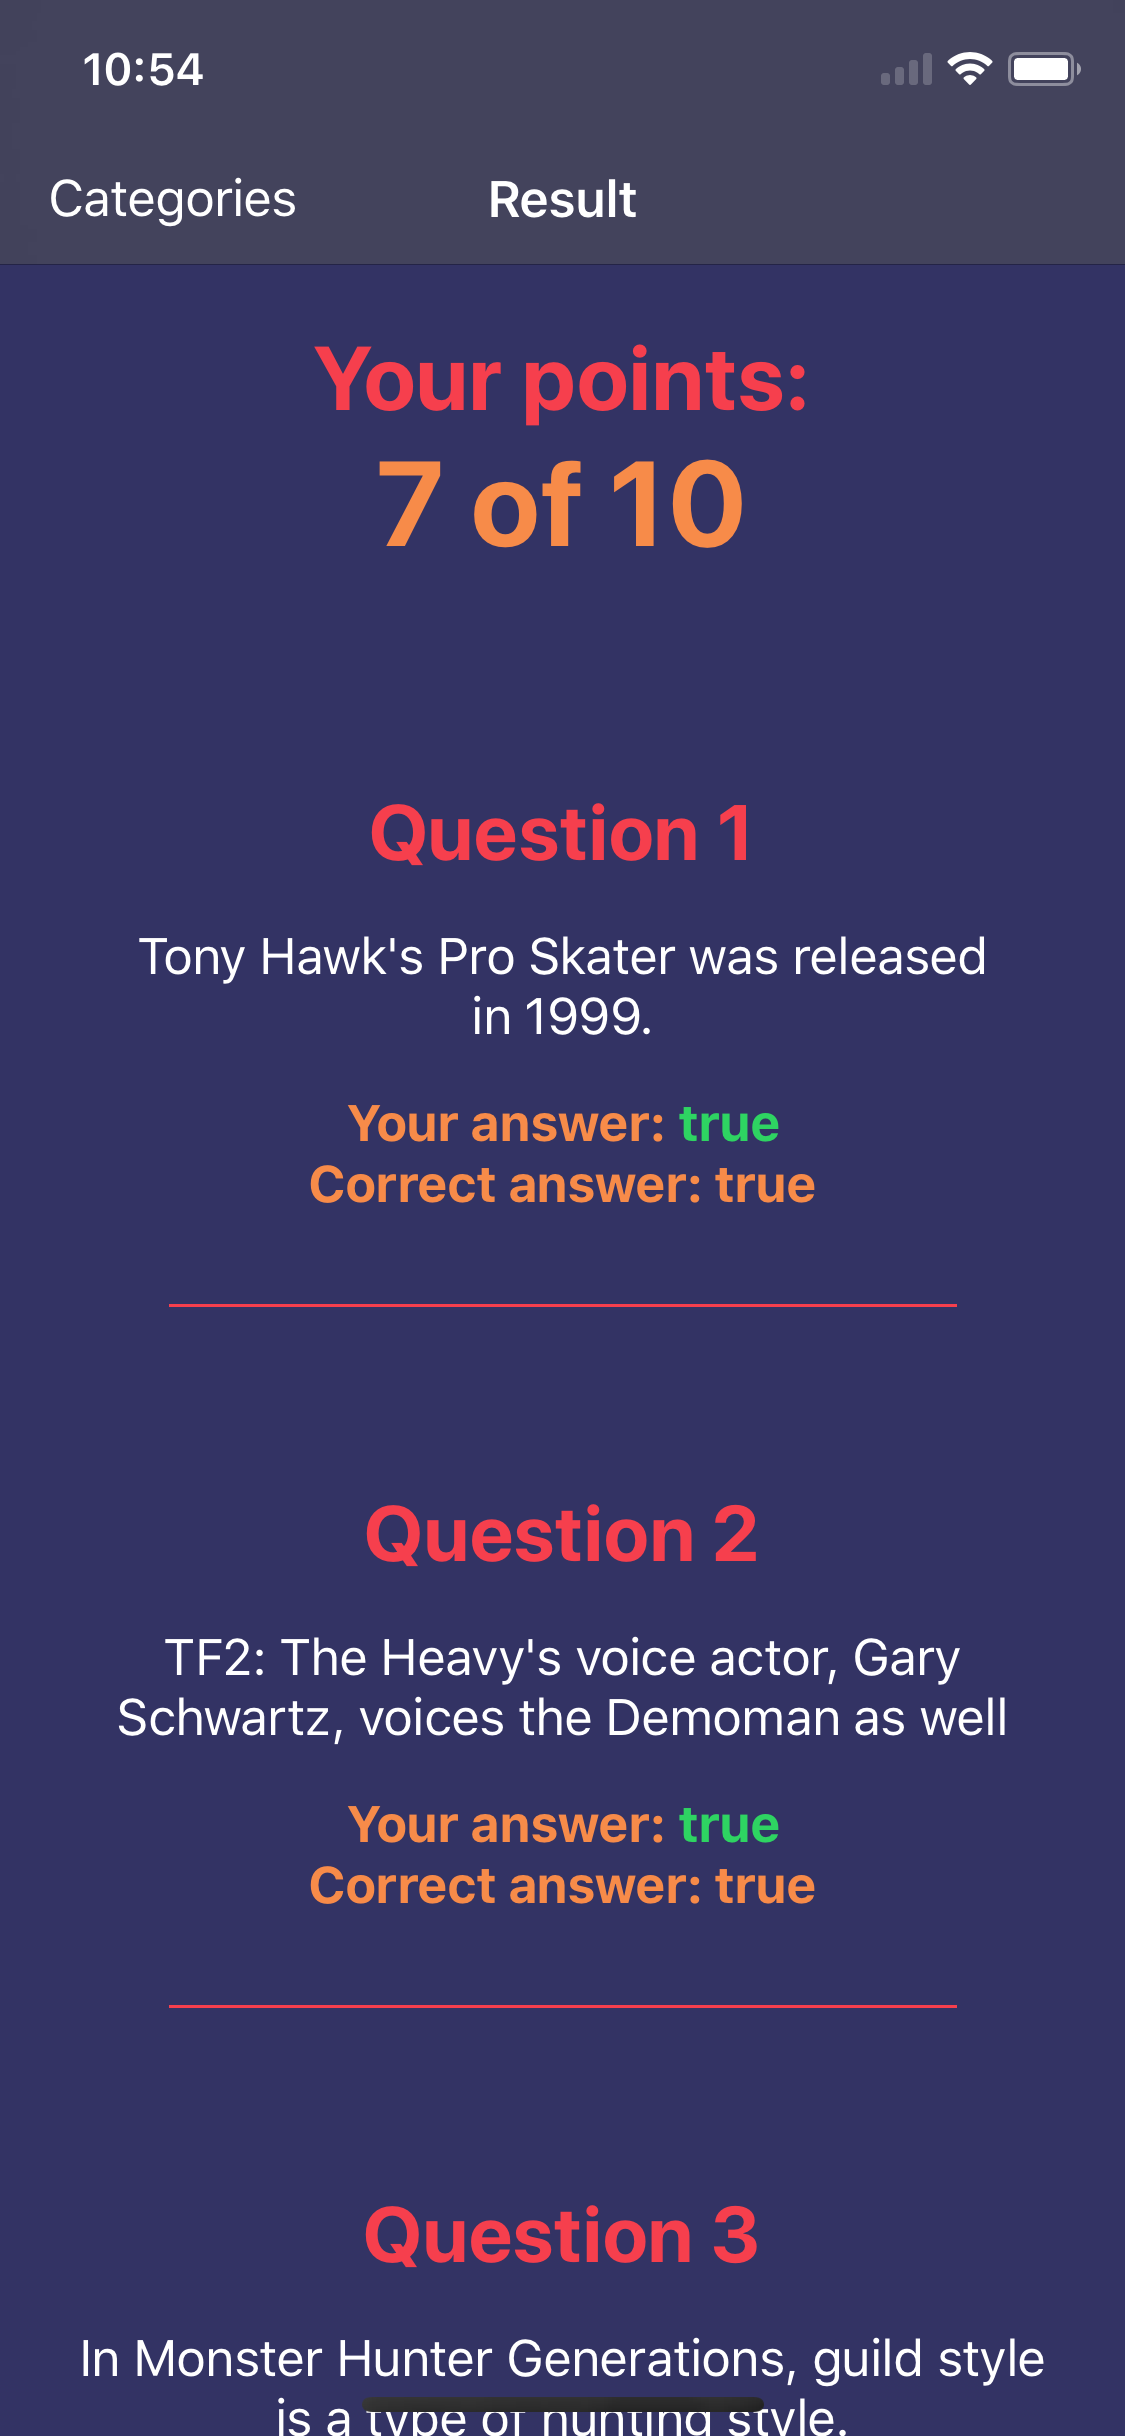
When the user answers all the questions, we redirect to the summary view, however, due to the fact that we have not created this view yet, our application shows an error and exceeds the range of displayed questions and tries to display the 11th question out of 10. To fix this and finish the game we need to create a summary view. We are going to display the number of points the user has obtained and all questions with answers. So we have to create a new container, add it to the game module and connect it to the routing.
ng generate component ./module/game/containers/result --module ./module/game
src/app/module/game/game-routing.module.ts
(...)
export const routes: Routes = [
  (...)
  {
    path: 'result',
    component: ResultComponent,
  },
];
(...)
src/app/module/game/game.module.ts
(...)
  declarations: [
    (...)
    ResultComponent,
  ],
(...)
src/app/module/game/containers/result/result.component.ts
import { Component, OnInit } from '@angular/core';
import { GameService } from '~/app/module/core/service/game/game.service';
import { RouterExtensions } from 'nativescript-angular';

@Component({
  selector: 'tg-result',
  templateUrl: './result.component.html',
  styleUrls: ['./result.component.css'],
  moduleId: module.id,
})
export class ResultComponent implements OnInit {
  private answers: any[];
  private points: any;

  constructor(
    private gameService: GameService, // AD.1
    private routerExtensions: RouterExtensions,
  ) { }

  ngOnInit() {
    this.answers = this.gameService.getAnswers(); // AD.2
    this.points = this.gameService.getPoints(); // AD.3
  }

  // AD.4
  navigateToCategories() {
    const navigationExtras: any = {
      clearHistory: true,
      animated: false,
      skipLocationChange: true
    };

    return this.routerExtensions.navigate( ['tabs', 'default'], navigationExtras);
  }
}
src/app/module/game/containers/result/result.component.html
<StackLayout class="main">
  <!-- AD.5 -->
  <ActionBar title="Result" class="action-bar">
    <NavigationButton visibility="collapsed"></NavigationButton>
    <ActionItem text="Categories" ios.position="left" (tap)="navigateToCategories()"></ActionItem>
  </ActionBar>

  <ScrollView>
    <StackLayout>
      <!-- AD.6 -->
      <StackLayout class="points">
        <Label
          class="points-label"
          text="Your points: "
        ></Label>
        <Label
          class="points-value"
          [text]="points.points + ' of ' + points.maxPoints"
        ></Label>
      </StackLayout>
      <!-- AD.7 -->
      <StackLayout
        class="question"
        *ngFor="let answer of answers; let i = index; let isLast = last;"
      >
        <Label
          class="question-number"
          [text]="'Question ' + (i + 1)"
        ></Label>
        <Label
          class="question-text"
          textWrap="true"
          [text]="answer.question"
        ></Label>

        <FlexboxLayout class="answer">
          <Label
            class="answer-label"
            text="Your answer:"
          ></Label>
          <Label
            class="answer-value"
            [text]="' ' + answer.answer"
            [ngClass]="{
              'answer-value--incorrect': answer.answer !== answer.correctAnswer
            }"
          ></Label>
        </FlexboxLayout>
        <Label
          class="answer-label"
          [text]="'Correct answer: ' + answer.correctAnswer"
        ></Label>
        <StackLayout
          class="separator"
          *ngIf="!isLast"
        ></StackLayout>
      </StackLayout>
    </StackLayout>
  </ScrollView>
</StackLayout>
- AD.1 - we use our GameService service again. It is responsible for the logic of the game;
- AD.2 - we collect an array of answers given in the last game;
- AD.3 - we calculate the number of points the user has obtained in the game;
- AD.4 - a method that redirects to the category selection view, that is our default application view;
- AD.5 - in this view we want to slightly extend the ActionBar widget with an additional button that will redirect using the navigateToCategories method, which has already been described above. To add this button we must use an additional ActionItem widget that allows you to embed your own elements on ActionBar. In addition, we overwrite another additional NavigationButton widget, with which we just want to hide the "back" button in order to block the possibility of navigating back to the displayed questions;
- AD.6 - a container in which we display the number of points obtained;
- AD.7 - using ngFor, we iterate over all responses and separate them by a horizontal line. In addition, we declare auxiliary variables such as the iteration index and information whether the currently iterated element is the last one.
Note: The NgFor directive allows you to declare local variables such as index or information about whether the currently iterated element is the last. You can read more about local variables here.

NativeScript app improvement
At the end of this part of the series, we are going to implement some small improvements to our application.
As you've probably noticed, the API questions we have are not formatted, so entities are displayed instead of characters. E.g. "& # 039;" instead of the single quotation mark. We have to fix this because the questions don’t look impressive in this form. So we will create our own pipe, which will change entities to their corresponding characters.
ng generate module ./module/shared/entity-decode
ng generate pipe ./module/shared/entity-decode/entity-decode --module module/shared/entity-decode --spec false
src/app/module/shared/entity-decode/entity-decode.module.ts
import { NgModule } from '@angular/core';
import { EntityDecodePipe } from './entity-decode.pipe';

@NgModule({
  declarations: [EntityDecodePipe],
  exports: [EntityDecodePipe],
  imports: [  ]
})
export class EntityDecodeModule { }
src/app/module/shared/entity-decode/entity-decode.pipe.ts
import { Pipe, PipeTransform } from '@angular/core';
@Pipe({
name: 'entityDecode'
})
export class EntityDecodePipe implements PipeTransform {
transform(value: string): string {
// AD.1
const map = {
'&': '&',
'&': "&",
'<': '<',
'>': '>',
'"': '"',
''': "'",
'’': "’",
'‘': "‘",
'–': "–",
'—': "—",
'…': "…",
'”': '”'
};
return value.replace(/\&[\w\d\#]{2,5}\;/g, m => map[m]); //AD.2
}
}
- AD.1 - we define entity objects;
- AD.2 - value parameter stores the text on which pipe is used. Using the replace method, we search for all entities and then replace them with their corresponding symbols from the map object.
Next, we import the EntityDecodeModule in GameModule to have access to it and to places where we display the content of the questions, we attach our pipe.
src/app/module/game/game.module.ts
(...)
import { EntityDecodeModule } from '~/app/module/shared/entity-decode/entity-decode.module';

@NgModule({
  (...)
  imports: [
    (...)
    EntityDecodeModule,
  ],
  (...)
})
export class GameModule { }
src/app/module/game/containers/questions/questions.component.html
(...)
<Label
  class="question-text"
  textWrap="true"
  [text]="answer.question | entityDecode"
></Label>
(...)src/app/module/game/containers/questions/questions.component.html(...)
<Label
   row="3"
   class="question-text"
   textWrap="true"
   colspan="2"
   [text]="getQuestion() | entityDecode"
 ></Label>
(...)
Now when you start the game, you should see the corresponding symbols instead of the entity characters. In a few places of our code, we used the type any, which tells nothing to the viewer. It is good practice to avoid any type and using your own types instead. Therefore, the next improvement will be the creation of several interfaces and then using them in the previously mentioned places.
ng generate interface ./module/core/entity/answer/answer
ng generate interface ./module/core/entity/question/question
ng generate interface ./module/core/entity/question/question-response
ng generate interface ./module/core/entity/points/points
Then we complete the newly created interfaces.
src/app/module/core/entity/answer/answer.ts
export interface Answer {
  question: string,
  answer: boolean | string,
  correctAnswer: boolean,
}
src/app/module/core/entity/question/question.ts
export interface Question {
  category: string,
  type: string,
  difficulty: string,
  question: string,
  correct_answer: string,
  incorrect_answers: string,
}
src/app/module/core/entity/question/question-response.ts
import { Question } from '~/app/module/core/entity/question/question';

export interface QuestionsResponse {
  response_code: number,
  results: Question[],
}
src/app/module/core/entity/point/point.ts
export interface Points {
  points: number,
  maxPoints: number,
}
Now we have to replace any types with our own. Search the entire project for ": any" and then replace them with newly created interfaces.
Hint: When creating applications, we often use the methods available in the NativeScript repository. An example here is the routerExtensions.navigate method in result.component.ts, to which we pass options. As you may have noticed, the options are in any type, which we used temporarily, but at this moment we need to improve it. If you don't know what type you should use, you can easily check it using the API Reference.
In our case, we search for the navigate method, where we see that extras take the type ExtendedNavigationExtras.
Now we just need to add the missing CSS, which is why I encourage you to switch to the next branch:
git checkout step4
git pull origin step4

Well, that’s it for today! In the next part we will focus on:
- adding the ability to change game settings;
- implementing game settings and adding a time limit for the answers;
- listing the best results.
Here's PART 4 of building NativeScript app guide.
Want to create apps in cross-platform frameworks with our devs? Check our job offers and join Merixstudio team!
.svg)


.svg)
.svg)
.avif)

.avif)
.avif)
.avif)
