Introduction
The use of grid layout is one of the main web design methodologies. Plenty of tools help Front-End Developers build grid-based websites (for instance Bootstrap, Foundation, or gridle{.scss}), with the introduction of CSS Grid Layout, we realize that until now we were never really able to implement grid on our websites.
The illusion of class-based grid
In fact, the class-based grid is only a simulation of what a real grid would be. In the actual two-dimensional grid rows and columns should be logically equivalent - moving content from one cell to another should require the same kind of operations, regardless of the vertical or horizontal direction.
Nonetheless, in the classic (i.e., class-based) grid systems used for web development, there was always the precedence of one dimension over the other. It was a choice between rows over columns or columns over rows, which means that instead of having a two-dimensional grid, the developer had either a pile of rows with columns inside or a series of columns containing rows.
Most commonly the composing of grid-based layout consisted of building a pile of rows divided into columns. But since those columns were unable to cross the rows, naming them like that was a mistake and the developers had to build columns separately for each row.
The whole procedure was not efficient in terms of coding - we needed separate classes for the grid container, rows, and for each width of the columns. If you wanted to build your own grid classes, without SCSS it required a huge amount of work. If you wanted to use two different grids on your page, let’s say a 12 column grid and a 7 column grid, this task became even more time-consuming.
The list of inconveniences of this approach is long, and I will not iterate through it here - let’s not dwell on the past! I will, however, cite just one thing that I find especially annoying. Since the gutter was obtained via padding, one had to put another `<div>` inside the column to give a column a background that would respect gutters. Luckily there’s a way to avoid that.
The CSS Grid Layout Solution
With CSS Grid Layout, all of those struggles are over. To implement a simple grid we need only one wrapper that will be our grid. And its direct children elements (HTML elements nested directly inside of the wrapper) will be placed in grid cells. As a result, we get an extremely clean and readable HTML markup.
In CSS Grid Layout rows and columns are really equivalent. You can place your element anywhere on your grid. You can span it across rows and columns, place it in a particular place, or rely on automatic placing. As there are already many general grid layout overviews and tutorials, in my article I am going to focus on a few features that make grid layout a particularly interesting tool.
Browser support
Browser support for CSS Grid Layout is growing fast. According to caniuse.com, the global support of CSS grid layout is at 82.8% (unprefixed) and 86.59% (adding prefixed use). The numbers are even better when we restrict ourselves to Polish internet environment - here the grid layout supports reaches 88.28% unprefixed, while prefixed adds to 89.75%.
Existing tutorials
CSS Grid Layout already has an extensive teaching basis, starting with many articles by Rachel Andrew, the concise and clear guide by Chris House, and ending with the recent (free) video course by Wes Bos. So everyone interested in CSS Grid can learn it easily and fast.
Layout
For my article, I wrote a simple website layout with typical sections of a header, footer, main banner, section with blog post excerpts, and a menu. Here’s the structure of its HTML markup (the complete example is embedded at the end of the post):
<body>
  <header class="header"></header>
  <div class="banner"></div>
  <main class="main-content">
    <article class="post"></article>
    <article class="post"></article>
  </main>
  <ul class="menu">
    <li class="menu__item"></li>
    <li class="menu__item"></li>
  </ul>
  <footer class="footer"></footer>
</body>
The first thing to notice is that using the CSS Grid Layout instead of class-based grids gives us the possibility to do it without intermediary container `<div>`s.
General grid
To give this structure a grid layout, I apply the `grid` display to the `<body>` element.
 body {
  display: grid;
  height: 100vh;
}
From the moment of applying `display: grid` to the body, all of its direct children elements become grid items, and will be placed either automatically or manually on the grid.
Then I define two columns and four rows of my grid:
body {
  grid-template-columns: 5fr minmax(auto, 1fr);
}
The above rule creates two columns. The right one will take the ⅙ of the total width of the grid, but won’t go below the width of its content (due to the minimal width of `auto`). In this case, I use the specific CSS Grid Layout unit - `fr`. Its name stands for “fraction” and corresponds to a fraction of the “free space” remaining after subtracting portions of the width defined with other units (`px`, `rem`, `em`, `%`, etc.). Here, `1fr` corresponds to the ⅙ of the width because the left column has a width of `5fr`.
I use the `fr` unit also to define the height of the third row:
body {
  grid-template-rows: auto auto 1fr auto;
}
Using the `fr` unit here allows me to have a grid that will always take at least the height of the viewport (I only need to set the body height to `100vh`).
Now my grid has four rows, two top rows, the bottom row taking the height of their content (`auto` height), and the third occupying the rest of the remaining vertical space.
For my layout, I will place grid-items explicitly instead of relying on automatic placing. Automatic placing would set each grid item in the seperate cell according to their order in the HTML markup We would get a header in the top-left cell, banner in the top-right cell, main-content in the left cell of the second row, menu in the right cell of the second row, etc.
Placing items in grid areas
To place my grid items, I use a very smart feature of grid areas. First I declare grid areas among the grid container’s CSS rules:
.grid {
  grid-template-areas:
    "header header"
    "banner menu"
    "content menu"
    "footer footer";
}
I create eight areas. The first one, named “header”, takes the top row, the second one, called “banner”, takes the first cell of the second row, etc.
To assign grid items to corresponding areas, I have to modify their CSS rules by adding one declaration per item:
.header {
  grid-area: header;
}

.banner {
  grid-area: banner;
}

.main-content {
  grid-area: content;
}

.menu {
  grid-area: menu;
}
To visually separate sections of my layout, I will introduce `5px` space between grid items.
body {
  grid-gap: 3px;
}
My basic layout is finished.
Nested grids
The CSS Grid Layout is also useful for styling such smaller components as content sections with blog posts or the blog posts themselves. We just apply `display: grid` to corresponding elements.
Main content
Let’s first have a look at the main content section. Here I use the grid layout to arrange a few “posts” inside the main content area:
.main-content {
  display: grid;
  grid-template-columns: repeat(auto-fit, minmax(250px, 1fr));
  grid-gap: 10px;
}
The `repeat()` function combined with `auto-fit` value makes it possible to not define explicitly how many columns a grid should have. Instead, it will have columns taking at least `250px` that stretch until there’s enough room to accommodate another column of at least `250px`. Simple and powerful.
Blog post
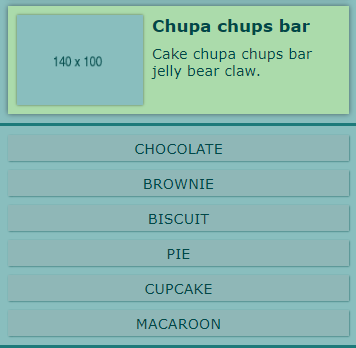
In the case of the blog posts, the grid is simple: one column and three rows for bigger screens, two columns and two rows for small mobile devices. In the first case, I have one column taking the whole available space (`1fr`), and three rows taking the height of the content (`auto`).
.post {
  display: grid;
  grid-template-columns: 1fr;
  grid-template-rows: auto auto auto;
  grid-template-areas:
    "heading"
    "image"
    "excerpt";
  grid-gap: 10px;
}
For the mobile view, I wanted my first column to take exactly the width of the image (`auto`), with the second column taking the remaining space (`1fr`).
@media screen and (max-width: 700px) {
  .post {
    grid-template-columns: auto 1fr;
    grid-template-rows: auto 1fr;
    grid-template-areas:
      "image heading"
      "image excerpt";
  }
}
Responsiveness
As we see in the example above showing the blog post box, the CSS Grid Layout gives us the possibility to easily change the placement of the grid items according to the device screen. Let’s have a closer look at that possibility (through my ‘.menu’ element).
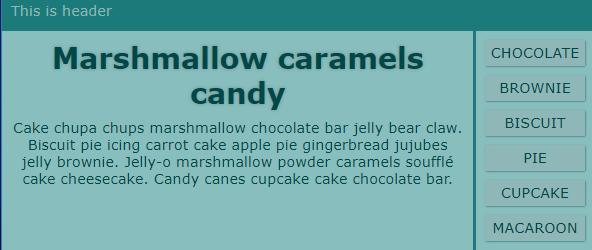
On desktop screens, the menu takes the form of a sidebar, taking the height of the banner and main content sections:
body {
  grid-template-areas:
    "header header"
    "banner menu"
    "content menu"
    "footer footer";
}
By the way, to organize menu items inside the sidebar, I also take advantage of the CSS Grid:
.menu {
  grid-area: menu;
  height: 100%;
  display: grid;
  grid-template-columns: 1fr;
  grid-template-rows: auto;
  grid-gap: 10px;
}
For the smaller screens (small laptops), I had the idea of placing it in a line between the header and main content. That way, the whole layout becomes one column wide.
@media screen and (max-width: 1000px) {
  body {
    grid-template-columns: 1fr;
    grid-template-rows: auto auto auto 1fr auto;
    grid-template-areas:
      "header"
      "banner"
      "menu"
      "content"
      "footer";
  }
}
Just one declaration transforms vertical menu into horizontal:
.menu {
  grid-template-columns: repeat(6, 1fr);
}
I continue playing with my menu on tablets, putting it back to vertical, but this time in the same row as the banner:
.@media screen and (max-width: 700px) {
  body {
    grid-template-areas:
      "header header"
      "banner menu"
      "content content"
      "footer footer";
  }
}

The menu as a small sidebar at the side of the banner
But on mobile phones I want the menu to be displayed below the content section:
@media screen and (max-width: 425px) {
  body {
    grid-template-areas:
      "header"
      "banner"
      "content"
      "menu"
      "footer";
  }
}

The menu on small mobile devices below the content
As we see, my menu wanders from the full sidebar, through the intermediate horizontal menu, small sidebar by the banner, to the bottom menu. Not only such an itinerary would be impossible to obtain with the class-based grid, but also we achieved it with a clean and self-explaining code - just one glance at the `grid-template-areas` values gives us the full understanding of the website’s RWD behaviour.
I would also like to point out the fact that my whole code contains almost no declaration of margins and paddings, as spacing is obtained through `grid-gap` and automatic placing of content inside grid cells.
You can check out the whole example here:
Unconventional uses of grid
To finish my article I would like to recommend you to check out some interesting and funny examples of CSS grid layout usage and to explore its vast possibilities:
- bar chart with CSS grid;
- responsive image gallery;
- recreating GitHub contribution graph (thanks to Oskar for the reference);
- animating CSS grid properties;
- grid as a mask on a picture.
Key terms (revision)
- grid track: a generic term signifying a column or row within a grid;
- grid gap: a space between grid-tracks. (For a grid you can define two different grid-gaps: one for the gap between rows, the other for the gap between columns. Unfortunately, you can’t customize a particular gap, let’s say between the first and the second row. To do this you need to insert an empty row.);
- grid area: a group of cells within the grid which you can cover with a content. You define areas with the `grid-template-areas` declaration. Important: areas must be compact and rectangular - you cannot define polygonal areas (for example L-shaped ones);
- `fr` unit: it stands for “fraction” and divides the free space of the grid that remains after deducing spaces defined with other units. For instance, in a grid with columns defined as `grid-template-columns: 200px 25% 1fr 3fr` (with the whole width of 1000px), the first column takes 200px, the second 250px, the third - ¼ of the remaining space, and the fourth - ¾ of the remaining space.
Closing word
For my article, I've chosen those features of The CSS Grid Layout which in my opinion show how powerful and pleasant to work with this tool is. I hope it will wake your interest in CSS Grid. I recommend you to go and see how it works IRL - explore it with development tools (in this same Firefox offers a very smart layout inspector for The CSS Grid) and start writing your own grids to be ready when the CSS Grid Layout becomes default composition tool in production. And I’m sure it will!
.svg)


.svg)
.svg)
.avif)

.avif)
.avif)
.avif)
